PPR Pipe Installation in Dubai: The Procedure, the Numbers, the Test
PPR pipe installation joins polypropylene pipes and fittings by heat fusion at about 260°C, so each joint becomes a single piece of plastic. The finished system is then pressure-tested before any wall is closed. Done correctly, it outlasts the building. Done with the wrong heating time, no room for expansion or no test, it leaks inside a wall months later.
We install PPR for renovations, new bathrooms and kitchens, reroutes, and rooftop tank and heater connections. This page sets out the procedure and figures we work to, so you know what a correct installation looks like whoever does it. Replacing an old copper or GI system? Start with our repiping page.
260°C
Fusion temperature
1.5×
Test pressure, 30+ minutes
AED 150+
Per new supply point
What PPR Is and Why Dubai Uses It
PPR (polypropylene random copolymer) is a rigid plastic pipe for hot and cold water. It joins by heat fusion instead of solder, threads or glue. It became the standard for new Dubai buildings for three reasons: it doesn't corrode or develop pinholes like copper, it resists scale, and a fused joint has no seal or ring that can perish.
Quality PPR is made to recognised standards, usually ISO 15874 or DIN 8077/8078, and the pipe itself should say so. Along its length you should find printed:
- the manufacturer
- the outside diameter and wall thickness
- the pressure class (PN) or SDR
- the standard it's made to
- a production date
Pipe with no marking, or with a patchy, uneven wall, doesn't belong in a wall you intend to tile over.
PPR has three weaknesses. Ultraviolet light makes it brittle, it expands more than metal when it heats up, and every joint is only as good as the person who makes it. The rest of this page is about handling those three things properly.
Choosing the Right PPR: Pressure Class and Pipe Type
Choose PPR by what the line carries. Use PN16 or higher for cold water. For hot water, use PN20 or a fibre- or aluminium-composite pipe, because PPR's pressure rating falls as temperature rises. Diameter follows flow:
- 20 mm to single outlets
- 25 mm for branches serving a whole bathroom
- 32 mm and up for mains and risers
| Pipe | Use | Expansion (mm per m per °C) | Notes |
|---|---|---|---|
| PPR PN16 (plain) | Cold water | 0.15 | The usual choice for concealed cold lines |
| PPR PN20 (plain) | Hot and cold water | 0.15 | Thicker wall; a common all-purpose pipe |
| PPR fibre composite | Hot water, longer exposed runs | about 0.035 to 0.09, by brand | A glass-fibre middle layer restrains expansion |
| PPR aluminium composite (stabi) | Hot water, rooftops, exposed runs | about 0.03 | The outer aluminium layer is peeled back before fusion |
PPR PN16 (plain)
- Use
- Cold water
- Expansion (mm per m per °C)
- 0.15
- Notes
- The usual choice for concealed cold lines
PPR PN20 (plain)
- Use
- Hot and cold water
- Expansion (mm per m per °C)
- 0.15
- Notes
- Thicker wall; a common all-purpose pipe
PPR fibre composite
- Use
- Hot water, longer exposed runs
- Expansion (mm per m per °C)
- about 0.035 to 0.09, by brand
- Notes
- A glass-fibre middle layer restrains expansion
PPR aluminium composite (stabi)
- Use
- Hot water, rooftops, exposed runs
- Expansion (mm per m per °C)
- about 0.03
- Notes
- The outer aluminium layer is peeled back before fusion
The system's pressure matters as much as its temperature. Apartments are usually fed through a pressure-reducing valve at a steady pressure. Villas often run on a booster pump that cycles on and off many times a day, and every cycle is a small pressure swing on every joint. On pumped systems we don't go below PN20 on hot lines, and we use composite pipe on anything exposed.
The expansion figures in the table come from manufacturer data. Fibre composites vary by brand, so we check the specific product before planning a long run.
The PPR Installation Procedure, Step by Step
Correct PPR installation follows the same sequence every time. Cut square, clean, and mark the insertion depth. Heat pipe and fitting together at about 260°C for the time set by the diameter. Push straight in without twisting, then hold still while the joint sets. Every step exists because skipping it makes a joint that looks fine and fails later.
- 1
Plan the route and fixed points
Mark where the pipe runs, where it must be fixed, and where it has to be free to move with temperature, before cutting anything.
- 2
Cut square
Cut with a PPR pipe cutter so the end is square and clean. An angled cut gives uneven insertion and a weak joint on one side.
- 3
Prepare composite pipe
On stabi-type aluminium composite pipe, peel the outer aluminium layer back to the insertion depth with the correct shaver.
- 4
Clean and dry
Remove dust, water and grease from the pipe end and inside the fitting. Contamination on the fusion surfaces ruins the weld.
- 5
Mark the insertion depth
Mark the depth from the fusion table on the pipe, so it goes into the fitting exactly as far as it should and no further.
- 6
Heat pipe and fitting together
With the iron at about 260°C, push the pipe into the heating socket and the fitting onto the heating spigot at the same time, and hold for the heating time for that diameter.
- 7
Join straight, without twisting
Remove both and push the pipe straight into the fitting to the mark. Twisting shears the molten layer; small alignment corrections are only possible in the first few seconds.
- 8
Hold and cool
Hold the joint still until it sets, and don't bend, load or pressurise it until the full cooling time has passed.
PPR fusion times by diameter
Typical figures for standard PPR at normal site temperatures. The pipe manufacturer's own chart always takes priority.
| Pipe diameter | Insertion depth | Heating time | Cooling time |
|---|---|---|---|
| 20 mm | 14 mm | 5 s | 2 min |
| 25 mm | 15 mm | 7 s | 2 min |
| 32 mm | 16.5 mm | 8 s | 4 min |
| 40 mm | 18 mm | 12 s | 4 min |
| 50 mm | 20 mm | 18 s | 6 min |
| 63 mm | 24 mm | 24 s | 6 min |
20 mm
- Insertion depth
- 14 mm
- Heating time
- 5 s
- Cooling time
- 2 min
25 mm
- Insertion depth
- 15 mm
- Heating time
- 7 s
- Cooling time
- 2 min
32 mm
- Insertion depth
- 16.5 mm
- Heating time
- 8 s
- Cooling time
- 4 min
40 mm
- Insertion depth
- 18 mm
- Heating time
- 12 s
- Cooling time
- 4 min
50 mm
- Insertion depth
- 20 mm
- Heating time
- 18 s
- Cooling time
- 6 min
63 mm
- Insertion depth
- 24 mm
- Heating time
- 24 s
- Cooling time
- 6 min
The most common mistake is adding a few seconds “to be safe”. Overheating is worse than underheating. It carbonises the plastic and makes a brittle joint that holds at first and cracks under pressure later. Below about 250°C the plastic doesn't fuse fully; above about 270°C it starts to break down.
A good joint shows a small, even ring of melted plastic around the outside where the pipe meets the fitting. Pushing the pipe past its mark forms a larger ring inside, which narrows the bore at that point for good. Our page on low water pressure explains how a single bad weld like this can starve one outlet from the day it was made.
On Dubai sites, keep pipe stored out of direct sun until it's used. The UV damage that makes exposed PPR brittle starts in the stack, not only after installation.
Expansion on Dubai Rooftops: the Maths Most Installers Skip
Plain PPR grows about 0.15 mm per metre for every 1°C rise in temperature. On an exposed Dubai rooftop, a hot line can swing 40°C or more between the day it's installed and the hours it's in use. At that swing, a 20-metre run of plain PPR grows by around 120 mm. Without loops, offsets or composite pipe, that movement bows the pipe and strains every joint along it.
Worked example
Run length: 20 m of hot line from a rooftop heater or solar tank
Temperature swing: 40°C
Plain PPR: 20 × 0.15 × 40 = 120 mm
Aluminium composite: 20 × 0.03 × 40 = 24 mm
We handle that movement three ways:
- Fixed clamps near branches, valves and wall penetrations, with sliding clips between them so the pipe can move along its length.
- A change of direction or an expansion loop to take up the growth, instead of letting it push against a tee.
- Composite pipe on long exposed hot runs, which cuts the movement to a fraction.
Pipes concealed in a wall are held by the wall, so the movement problem is mostly an exposed-run problem. That makes it most relevant on rooftops, in plant rooms, and on the long runs from a solar water heater down into the house.
Supports, Sleeves and UV Protection
PPR needs closer clip spacing than metal pipe, and hot lines need clips closer still. Any run exposed to sunlight needs protection, because ultraviolet light makes it brittle over time. Where pipes pass through walls or slabs, a sleeve lets them move instead of cracking at the penetration.
We follow the manufacturer's clip spacing for each diameter and temperature, not a single spacing for the whole job. A hot line clipped at cold-line spacing sags between supports once it has been through a few Dubai summers.
On rooftops, exposed PPR is protected in one of three ways: UV-resistant insulation with cladding, a protective wrap, or conduit. Hot lines get insulated anyway, to hold temperature. Cold lines on a roof benefit from insulation too, because an exposed cold pipe in August delivers water far warmer than anyone wants from a cold tap.
What PN Means, and Why It Drops With Heat
The PN number printed on PPR pipe is its nominal pressure in bar for cold water at 20°C over a 50-year design life. It isn't the pressure the pipe can take at every temperature. As water gets hotter, the pressure the same pipe can safely carry for decades falls well below the PN figure. That's why a pipe that's comfortable on a cold line can be underrated on a hot one.
Manufacturers publish this as service classes for hot water: a design temperature, such as 60°C or 70°C, and the working pressure the pipe is rated for at that temperature. When we specify pipe for a hot line, we read the class table for the actual temperature the water heater is set to. The PN number alone isn't enough.
SDR is the other number you'll see. It's the outside diameter divided by the wall thickness, so a lower SDR means a thicker wall and a higher pressure rating for the same diameter. PN20 PPR, a common hot-and-cold choice, has a noticeably thicker wall than PN16 of the same size. That's also why its bore is slightly smaller, and why hot branches are sometimes sized up a step.
Concealed PPR: Chases, Joints and Access
Concealed PPR should run in chases deep enough for the pipe and any insulation to sit below the plaster line, with as few joints as possible inside the wall. Anything that may need attention later, such as isolation valves and transitions to other materials, goes behind an access panel. Every joint you bury is a joint you can only reach by breaking tiles.
On bathroom and kitchen work, we prefer to run one continuous length from a junction point to each outlet, rather than a chain of tees along the wall. It uses more pipe but puts fewer fused joints behind the tiles. Where a manifold feeds several outlets, the manifold sits somewhere reachable, such as a cabinet or behind an access panel, so any one outlet can be isolated without shutting down the whole room.
Hot lines in walls are insulated as well as cold lines near them. That keeps heat in the hot water and keeps the cold line cold. Without insulation, a hot and cold line sharing a chase warm each other, and the first minute from the cold tap runs tepid.
Installing PPR During a Renovation
In a renovation, PPR has to fit around the waterproofing and the tiling, not the other way round. The pipe goes in and is pressure-tested before the waterproofing membrane is applied. Every pipe penetration through a wet-area floor or wall is then sealed as part of the membrane. The tiler starts only after both are done.
The most expensive mistake in a bathroom renovation is a drill or chisel going through the new membrane or a new pipe after both are in. We mark every pipe route and photograph it before it's covered. That gives the tiler, and whoever fixes the shower screen or towel rails later, a map of where not to drill.
Mixer and shower valve bodies are set to the finished wall depth the tiler gives us, so the trim plates sit flush. A valve set too deep or too shallow is one of the most common small snags after renovation, and it's only easy to fix before the tiles go up. For the whole job, from permits to handover, see our bathroom renovation service. Our bathtub and shower services page covers the fixtures themselves.
Connecting PPR to Water Heaters and Tanks
At a water heater, we connect PPR through brass transition fittings and isolation valves on both the cold inlet and the hot outlet. That lets the heater be isolated and replaced without cutting any pipe. The hot outlet run uses hot-rated pipe from the first fitting, and the relief valve discharge gets its own route to a drain. Our water heater installation page covers the heater side.
On villa rooftop and underground tanks, the outlet and float-valve connections are the points that move most. Tank walls flex as the level changes, and rooftop pipe expands in the sun. A short flexible section or a change of direction near the tank stops that movement from loading a rigid fused joint. Exposed pipe at the tank gets the same UV protection as any other rooftop run.
When an installation includes a booster pump, we fit isolation valves either side of it and use a non-rigid connection. Pump vibration travelling into rigid PPR is a slow way to crack a fitting.
What an Installer's Tools Tell You Before Work Starts
You can judge a PPR installer before the first joint by looking at what they bring: a temperature-controlled fusion iron, clean heating dies, a proper pipe cutter, a shaver if composite pipe is specified, and a pump and gauge for the pressure test. If any of these is missing, a step in the procedure is going to be skipped.
A temperature-controlled fusion iron
A thermostat or digital readout set to about 260°C. An iron with no way of showing its temperature leaves every joint to guesswork.
Clean, undamaged heating dies
The non-stick dies should be free of burnt plastic. Carbonised residue on a die transfers heat unevenly and contaminates the joint.
A proper pipe cutter
A PPR cutter gives a square, burr-free end. A hacksaw leaves an angled, rough cut and a joint that's weak on one side.
A shaver, if composite pipe is used
Stabi-type aluminium composite needs its outer layer removed to exactly the right depth. Without the right shaver, that step gets skipped or done badly.
A test pump and gauge on site
An installer who arrives without a way to pressure-test isn't planning to test before the walls close.
A Pre-Close Checklist You Can Use on Site
Before any wall, ceiling or screed goes over new PPR, check nine things: even melt rings at joints, the right pipe class, close clip spacing, insulation, reachable valves, valve depth, sleeves at penetrations, a pressure test record, and route photos. Each takes seconds to check now and a broken tile to check later.
- 1Every joint shows a small, even melt ring, with no gaps, no lumps and no scorched or brown plastic.
- 2Pipe is marked with its standard and PN class, and hot lines use hot-rated pipe (PN20 or composite).
- 3Clips are close together, closer on hot lines than cold, and nothing sags between them.
- 4Hot lines are insulated, and cold lines sharing a chase with hot lines are insulated too.
- 5Valves and any threaded transitions sit behind an access panel or in a cabinet, not buried in a tiled wall.
- 6Mixer and valve bodies are set to the finished wall depth the tiler has confirmed.
- 7Pipes pass through walls and wet-area floors in sleeves, and the penetrations are ready to be sealed into the waterproofing.
- 8There is a pressure test record: gauge photos at the start and end of the hold, with the time visible.
- 9Every route is photographed before it's covered, and you have a copy.
If your contractor is someone else and you'd like a second opinion before the tiler arrives, we can run the pressure test and walk the installation against this list. That's priced as a pressure test and report on an existing installation.
Pressure Testing Before the Walls Close
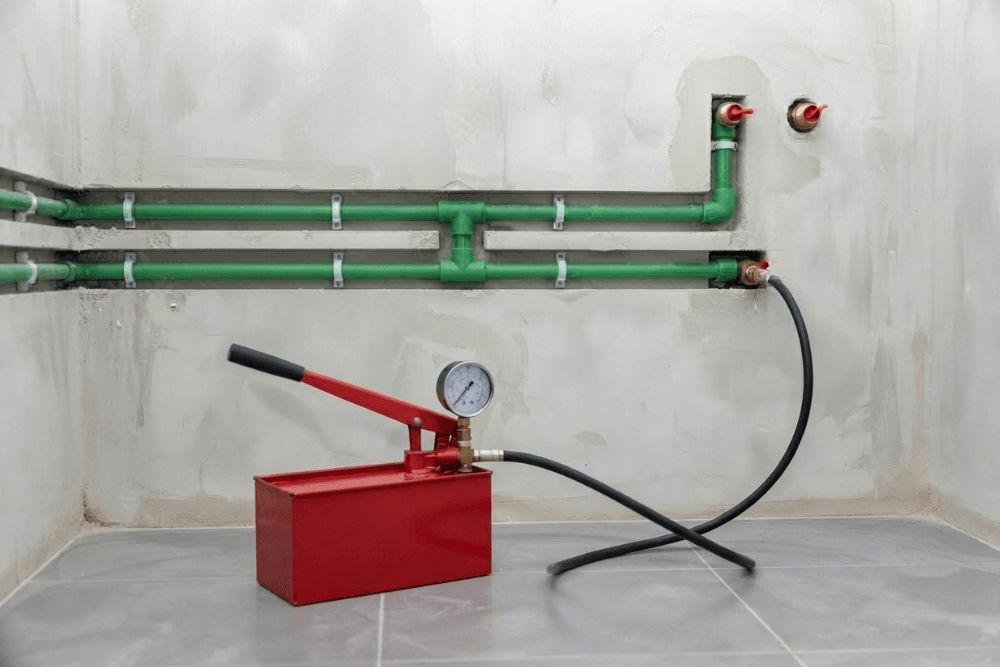
Every new PPR installation should be pressure-tested before any wall, ceiling or screed covers it: 1.5 times its working pressure, for at least 30 minutes, with the result recorded. A test after tiling only tells you there's a leak. A test before tiling tells you where it is, and the fix costs nothing but a fitting.
How we run it
- Let every joint reach its full cooling time.
- Fill the system slowly and bleed out the air, because trapped air compresses and hides small drops.
- Cap every open outlet.
- Bring the system to test pressure with a hand pump.
Plastic pipe stretches slightly under pressure, so a small early drop is expected. Recognised test procedures allow for this with a pre-test period before the timed hold, and so do we.
What a failed test looks like
A gauge that keeps falling after the pre-test period means water is escaping. We walk every joint and check it by eye and by touch. A leaking fused joint is cut out and remade, never “tightened” or sealed over. Then the whole test runs again from the start.
The record you keep
We photograph the gauge at the start and end of the hold, with the time visible, along with the pipe routes before they're covered. Buying a new build and want that level of checking on the developer's installation? Our plumbing snagging inspection includes a pressure hold on the concealed pipework.
Seven PPR Installation Faults and How They Show Up Later
Most PPR failures are installation faults, not material faults. They trace back to how joints were heated and pushed together, how the pipe was supported and protected, and how threaded connections were tightened. Each fault has a pattern that points back to what went wrong. The usual culprits:
- joints heated too long or too short
- pipe twisted or over-inserted
- no allowance for expansion
- sunlight on unprotected runs
- over-tightened threaded adapters
| Fault | How it shows up | When |
|---|---|---|
| Overheated joint | Brittle, carbonised joint that cracks under pressure | Weeks to months |
| Underheated (cold) joint | Slow weep at the joint face | Often within the first months |
| Pipe pushed past its mark | Weak flow at one outlet from the start | Immediately |
| Pipe twisted while joining | Poor fusion and a leak at the joint | Under the first pressure cycles |
| No room for expansion | Bowed runs, strained tees, cracked fittings on rooftops | The first summer |
| Over-tightened threaded adapter | Cracked plastic around a brass insert at a tap or heater | Days to months |
| Unprotected in sunlight | Chalky, brittle surface and cracks on exposed runs | Years |
Overheated joint
- How it shows up
- Brittle, carbonised joint that cracks under pressure
- When
- Weeks to months
Underheated (cold) joint
- How it shows up
- Slow weep at the joint face
- When
- Often within the first months
Pipe pushed past its mark
- How it shows up
- Weak flow at one outlet from the start
- When
- Immediately
Pipe twisted while joining
- How it shows up
- Poor fusion and a leak at the joint
- When
- Under the first pressure cycles
No room for expansion
- How it shows up
- Bowed runs, strained tees, cracked fittings on rooftops
- When
- The first summer
Over-tightened threaded adapter
- How it shows up
- Cracked plastic around a brass insert at a tap or heater
- When
- Days to months
Unprotected in sunlight
- How it shows up
- Chalky, brittle surface and cracks on exposed runs
- When
- Years
A single faulty joint doesn't condemn the whole system. When several joints from the same original installation fail one after another, the workmanship problem is system-wide, and a section repipe becomes the better value. For fixing one leaking joint, see our PPR and PEX joint leak repair service.
Joining New PPR to Copper, PEX or Existing Pipework
Partial jobs join new PPR to what's already there with transition fittings: PPR fittings with a brass threaded insert, connected to a matching brass adapter on the copper or PEX side. The plastic end is fused as normal. The threaded end is sealed and tightened with care, because over-tightening cracks the plastic around the insert.
PPR can only be heat-fused to PPR. It won't fuse with PE, PVC or PEX, and it should never be glued. Where possible, we put transitions behind an access panel or in a plant room rather than deep in a tiled wall. A threaded joint is the one part of a PPR system that may need attention years later, so it should be reachable.
PPR Pipe Installation Cost in Dubai
PPR pipe installation in Dubai costs AED 150 to 350 per new supply point, and AED 1,500 to 3,500 for a full bathroom supply rough-in. Prices cover pipe, fittings, fusion work, clips, insulation on hot lines, and a recorded pressure test. Chasing walls in finished rooms, retiling and sanitaryware are quoted separately.
| Work | Typical price |
|---|---|
| New supply point (one outlet, open wall) | AED 150 - 350 per point |
| Bathroom supply rough-in (3 to 4 points) | AED 1,500 - 3,500 |
| Kitchen supply lines | AED 800 - 2,000 |
| Rooftop tank or heater connection, insulated and UV-protected | AED 800 - 2,500 |
| Pressure test and report on an existing installation | AED 250 - 450 |
New supply point (one outlet, open wall)
- Typical price
- AED 150 - 350 per point
Bathroom supply rough-in (3 to 4 points)
- Typical price
- AED 1,500 - 3,500
Kitchen supply lines
- Typical price
- AED 800 - 2,000
Rooftop tank or heater connection, insulated and UV-protected
- Typical price
- AED 800 - 2,500
Pressure test and report on an existing installation
- Typical price
- AED 250 - 450
Four things move a job within these ranges:
- Pipe type. Composite pipe costs more than plain PPR and needs an extra preparation step.
- Access. Open walls in a renovation are quicker than working around finished surfaces.
- Distance. A long run from a rooftop tank or heater takes more pipe, more clips and more insulation.
- Visits. Walls that aren't ready on the day the pipe is due to be tested mean a second visit.
Replacing an existing copper or galvanised system rather than adding new points is priced as a repipe, because it includes survey, rerouting, disconnecting the old pipes and cut-over.
PPR Pipe Installation FAQ
How much does PPR pipe installation cost in Dubai?
What temperature is used to weld PPR pipe?
How long do you heat a 20 mm PPR joint?
Which PPR pipe is best for hot water?
Can PPR pipe be used outdoors in Dubai?
How long does PPR pipe last?
Can PPR be glued or joined to other plastics?
Can PPR handle the pressure from a villa booster pump?
Does PPR need insulation in Dubai?
Is PPR pipe safe for drinking water?
How long does a PPR bathroom rough-in take?
How can I tell if my PPR was installed properly?
Fused Right, Tested Before It's Covered
Tell us what you're installing (a new bathroom, a reroute or a rooftop connection) and when the walls are open. We'll price it, install it to the numbers on this page, and leave you the test record.